Excavation Contractors provide a crucial service, handling everything from soil preparation to earth moving. They also integrate vital infrastructure and implement erosion control measures, making them a critical part of construction projects.
They are responsible for digging foundation trenches to establish a stable base for buildings and ensuring the site is safe by marking any buried utilities. They can even help preserve topsoil, which helps reduce air pollution, provides a habitat for wildlife and protects against drought. Visit bartexcavationllc.com to learn more.
Site preparation is a crucial phase that ensures the groundwork for construction is solid, allowing for smooth building and preventing problems like structural damage and drainage issues. Whether you’re working on a new home, a commercial project, or installing septic systems, an excavating contractor can help you get the job done right. These professionals handle a range of essential tasks, including land clearing and grading, excavation services, and utility mapping.
When searching for an excavating contractor, it’s important to choose one with a strong reputation and excellent track record. Check for online reviews and recommendations to gauge the reliability of a company. You can also ask for references from previous clients, which will help you determine whether they’re a good fit for your needs.
Ask potential contractors to provide quotes for your specific project. It’s important to know what the total cost will be, as some excavation companies will add additional fees for things like hauling away excess dirt or relocating utilities. A reputable contractor will be transparent about their pricing and include all costs upfront.
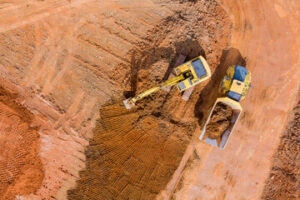
During the site preparation process, an excavation contractor will clear the land of trees, rocks, debris, and other obstacles that could interfere with construction. They may even need to demolish existing buildings or structures on the property. They also use soil testing to ensure the ground is suitable for construction and design a site plan that accounts for any potential issues.
In addition to clearing the land, an excavating contractor will grade and level it to create a flat surface. This step is essential for laying foundations and underground utilities and ensures that the structure will be built on solid ground. It’s also helpful for controlling erosion and complying with environmental regulations.
Another crucial step in the preparation process is mapping out existing utilities, which can be challenging if records are old or inaccurate. A skilled excavation contractor will be able to mitigate these issues by performing thorough and detailed surveys. By identifying and labeling all the existing pipes, electrical, gas, and water lines on a site, they can prevent expensive mistakes during the actual excavation process.
Integrating Vital Infrastructure
Although their work represents a small fraction of a construction project, excavation contractors lay the foundation for success in other aspects of a construction site. Their duties include precision planning that considers topography, soil conditions and project specifications. They coordinate with builders, engineers and local authorities to ensure that their excavation efforts align with the broader project goals.
They are also responsible for integrating vital infrastructure into construction sites. This includes creating trenches or conduits for water, sewage, electricity and gas systems. These systems are critical for modern life, and the excavation contractor plays an important role in their safe installation on construction sites.
Another essential aspect of their job is the inspection and maintenance of excavating equipment. This ensures that the machinery is in good working condition and adheres to all safety protocols. A well-maintained machine is less likely to cause costly delays due to mechanical breakdowns or incompatibility with the construction site.
A skilled excavation contractor knows how to handle a variety of heavy equipment, including bulldozers, backhoes and trenchers. These machines are vital to the efficiency and safety of the excavation process. The contractor also knows how to operate and repair them safely and effectively.
When hiring an excavation contractor, be sure to ask about their experience in the type of construction you need completed. This will help ensure that the contractor is prepared to meet your specific needs and avoid any surprises down the road. It’s also important to ask the excavation contractor about the required permits for your particular project. Some contractors will require property owners to pull the necessary permits, while others will handle it all in-house.
One of the most significant issues in construction and excavation is damage to buried infrastructure. In the United States alone, there are over 500,000 incidents each year of pipelines, cables and wires being damaged by construction or excavation activities. The best way to prevent these accidents is to have a trained and professional excavation contractor pre-mark your dig site before any digging begins. This is known as white-lining and is a key part of the safe digging process.
Excavation Techniques
When you hire an excavation contractor, they handle a plethora of tasks that go well beyond just moving dirt. Their responsibilities include site preparation, managing underground utilities safely, and strategically planning the site to support the weight and structure of future construction. By using their specialized knowledge and sophisticated equipment, excavating contractors lay a strong foundation for construction projects and head off potential obstacles that could derail them later on.
The land clearing process is the first step in preparing the site for excavation work. This involves removing trees, vegetation, and other obstructions that might interfere with the project or present safety hazards. In addition, grading the soil and leveling hills or filling valleys may be necessary to ensure that the final structure will sit on a stable base.
Next, the excavation contractor will dig trenches to install utilities like water, sewer, and electrical lines. This is a dangerous job that requires specialized equipment and expertise to prevent cave-ins. Additionally, they will slop the soil to direct rainwater away from the building and prevent flooding and erosion.
Excavating contractors are also responsible for laying the groundwork to shape the site, creating access roads, parking lots, and landscaping features. By shaping the land, they make it easier for people to move around and provide a safe environment that complies with all regulations.
Lastly, excavation contractors can assist in the remediation of contaminated soil on construction sites. This involves removing and replacing contaminated soil with clean soil that meets all environmental regulations.
When choosing an excavation contractor, it’s important to consider their experience and track record. Homeowners should check the contractor’s reputation online and with local business bureaus to see how they have dealt with past clients. Additionally, homeowners should ask about their references and speak with them to learn more about their experience working with the company. By taking the time to do their homework, homeowners can find a qualified contractor who will meet their needs and provide quality results.
Safety
A successful excavation contractor relies on a range of technical and soft skills. In addition to knowing how to operate heavy machinery like bulldozers and backhoes, they must be able to understand the risks involved in this type of work and take steps to mitigate those hazards. This includes being able to identify unstable soil conditions and other potential dangers, such as underground utility lines that may be in the path of an excavating machine.
The ability to interpret and follow project plans is also essential for this job. Laborers should have an understanding of the various techniques that are needed to execute construction tasks in accordance with the plans, including implementing appropriate soil stabilization methods when necessary. This is especially important when working in areas with existing structures, such as buildings or swimming pools. Laborers must exercise extreme caution to prevent structural damage or foundational issues due to the presence of these structures.
Finally, a good excavating contractor must be able to effectively manage any unexpected challenges that may arise during the course of a project. This can include the discovery of undocumented water, gas, or electrical lines that need to be safely rerouted. These types of unforeseen issues can create significant delays and increase the overall cost of a construction project, so it’s important for an excavation contractor to have the expertise required to resolve them quickly and efficiently.
During the interview process, look for an excavation contractor who has examples of previous projects and references from past clients. Reviewing these can give you a better idea of their quality of work and how they’ve handled various challenges. It’s also a great way to see what kind of equipment they use, as this can help you determine how well they’ll be able to perform your work.
You should also ask an excavation contractor about the safety policies they have in place and any training they’ve received to handle the equipment. In addition, you should verify that they’re licensed and insured to conduct business in your area. This is an indication that they’ve been properly trained and that they follow the proper guidelines to protect themselves, their employees, and their clients.